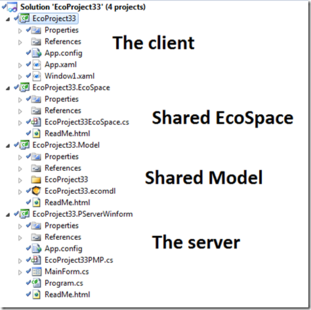
Numerous ways to set up an Eco-based system already exist. Besides having a multitude of PersistenceMappers that enable Object-relational mapping for the most popular databases, Eco also provides a Bridged communication between an Eco-client and an Eco-server. Since Eco6, this is performed by the EcoPersistenceClientWCF (client) and the EcoPersistenceMapperProviderWCF (server).
This bridge handles all server communication in terms of queries, fetches, lazy loading, updating, and refreshing over an XML-based format we call DataBlock. Several advantages come from using this client-server bridge rather than having clients hook up with the server-based database by itself:
- The client does not need to know anything about the database being used – hence no distribution of Client-db-communication-setups.
- The server does not need to expose the database for client calls and thus, invite attacks from all the suckers out there.
- The server can provide you with an efficient Refresh mechanism that can easily be set up to synchronize all the clients.
With Eco6, the bridge is implemented with WCF – before Eco6, this was implemented with .net Remoting. WCF is more flexible, configurable, and better in every way.
Eco creates a BasicHttpBinding if nothing else is configured. This is a quick way to get things going, but many situations call for better security, less overhead, and/or authentication which is easily achieved with WCF. Maybe you want to create your own binding implementation to solve some business requirements - WCF is good for that too.
I added a sample, EcoProjectWCF_NET_TCP_Binding, to show how to configure different bindings from the standard BasicHttpBinding.
The Client’s WCF Settings
The client has an App.Config that can be left empty, but in this sample, it looks like this:
Code Snippet
<?xml version="1.0" encoding="utf-8" ?>
 <configuration>
  <system.serviceModel>

   <client>
    <endpoint name="TheEndPoint"
      address="net.tcp://localhost:8001/EcoProject33WinFormServer"
      binding="netTcpBinding"
      contract="Eco.Wcf.Common.IPersistenceMapperWCF">
   </endpoint>

   <endpoint name="SomeOtherEndPoint"
     address="http://localhost:8001/EcoProject33WinFormServer"
     binding="basicHttpBinding"
     contract="Eco.Wcf.Common.IPersistenceMapperWCF"></endpoint>
  </client>

 </system.serviceModel>
</configuration>
It defines a named EndPoint “TheEndPoint”, defines the binding as netTcpBinding, and has the IPersistenceMapperWCF contract. This contract is the same for every Eco client-server bridge.
Also, note the Address that points out the server – we need to make sure that the server is available at that address. Server configuration is explained in the next section.
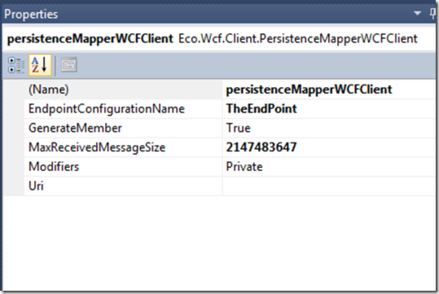
In the EcoSpace, which is shared by the client and the server and is the place to define the client persistence mapper, we have added the PersistenceMapperWCFClient. To use the setting from the App.Config, we set the EndpointConfigurationName to the one used in the config: “TheEndPoint”. Done. The Client is all set.
When the EndpointConfigurationName is set, the PersistenceMapperWCFClient component ignores the Uri setting. The Uri setting is only there to give an address to the server for the default BasicHttpBinding. The MaxReceivedMessageSize setting is also ignored since this is better defined on the binding in the App/Web.Config.
The Server’s WCF Settings
The server also has an App.Config. If your server is hosted by IIS, then it is a web.config but the content is the same:
Code Snippet
<?xml version="1.0" encoding="utf-8"?>
<configuration>

 <system.serviceModel>

  <services>
    <service name="EcoProject33.EcoProject33PMPWCF"
       behaviorConfiguration="ServiceBehavior">
      <endpoint address=""
          behaviorConfiguration=""
          binding="netTcpBinding"
          bindingConfiguration="TheTCPBinding"
          contract="Eco.Wcf.Common.IPersistenceMapperWCF">
      </endpoint>
     </service>
    </services>

  <bindings>
    <netTcpBinding >
       <binding name="TheTCPBinding"
          closeTimeout="00:01:00"
          openTimeout="00:01:00"
          receiveTimeout="00:10:00"
          sendTimeout="00:01:00"
          transactionFlow="false"
          transferMode="Buffered"
          transactionProtocol="OleTransactions"
          hostNameComparisonMode="StrongWildcard"
          listenBacklog="10"
          maxBufferPoolSize="524288"
          maxBufferSize="65536"
          maxConnections="10"
          maxReceivedMessageSize="65536">
     <readerQuotas
        maxDepth="32"
        maxStringContentLength="8192"
        maxArrayLength="16384"
        maxBytesPerRead="4096"
        maxNameTableCharCount="16384"/>
        <reliableSession ordered="true" inactivityTimeout="00:10:00" enabled="false"/>

        <security mode="Transport">
         <transport clientCredentialType="Windows" protectionLevel="EncryptAndSign"/>
        </security>

      </binding>
     </netTcpBinding>
    </bindings>

  <behaviors>
   <serviceBehaviors>
    <behavior name="ServiceBehavior">
     <serviceDebug includeExceptionDetailInFaults="false" />
    </behavior>
   </serviceBehaviors>
  </behaviors>
 </system.serviceModel>
</configuration>
This config file defines the Service. The name is important and unique for each ECO project you create – it is the class of the WCF stub that you will find in the <projectname>PMP.cs file:
Code Snippet
/// <summary>
/// This class is used to register the WCF server portion of a PersistenceMapperProvider
/// </summary>
public class EcoProject33PMPWCF : PersistenceMapperProviderWCF<EcoProject33PMP>
{
The contract in the config endpoint will always be the same: Eco.Wcf.Common.IPersistenceMapperWCF
A good feature is that you can add several endpoints to your service. You can then have multiple types of clients that communicate in different ways. Silverlight does not support many Bindings (not our fault) so Silverlight clients need to talk over HTTP. If you have in-house clients or ASP.NET servers on the safe side of the firewall, you will most likely want something more efficient.
The last thing to configure for the server in this sample is to call Register with an Address:
Code Snippet
public void RegisterServer()
{
 lblStatus.Text = "Server status: Started " + DateTime.Now.ToString();
 host = EcoProject33.EcoProject33PMPWCF.Register("net.tcp://localhost:8001/EcoProject33WinFormServer");
}


